DIY Sugar Scrub With Orange And Cedarwood
Want to get the spa experience at home? Try this DIY Sugar Scrub with Orange Cedarwood. It’s made with just four ingredients and so easy to make.

This post contains affiliate links. Please read my affiliate disclosure.
Before I starting whipping up DIY sugar scrubs I used to be obsessed with those bath and body stores at the mall. I loved opening the sample bottles and smelling the different scents of bath products. What I didn’t realize back then was all those scents were artificial. I mean with a scent like Hawaiian Vanilla you would think I would have known that but I honestly just didn’t give it much thought.
What is This Sugar Body Scrub Used For?
Sugar body scrubs are great for exfoliating your skin, as they aid in keeping it healthy by removing dead skin cells, lifting away dirt and excess oil, as well as stimulating circulation.
Glycolic acid occurs naturally in sugar, and is helpful for cleansing the skin and dissolving dead skin cells. It’s also a humectant and will not strip your skin of its precious natural oils.
Ditch Store-Bought Body Scrubs
Now that I’ve been on this natural living journey I know that those synthetic fragrances in bath and body products can contribute to toxic overload for the body. Those artificial scents (along with other toxic chemicals in common household items like bleach, harsh cleaners, and personal care products) can actually cause allergies and asthma even if you’ve never had it before. Check out my webinar on a non-toxic home here.
Yikes! That’s a lot to take on when all you want is body scrub that smells nice. That’s why I LOVE making my own bath and body products with essential oils. It’s so easy to make – this recipe is just four ingredients – and I’m sure you already have them in your kitchen.
Ready to get started making this DIY Orange Cedarwood Sugar Scrub?
How to Make This DIY Orange Cedarwood Sugar Scrub
- Gather your ingredients together.
- Pour brown sugar into a medium sized bowl.
- Add fractionated coconut oil.
- Add essential oils.
- Mix until thoroughly blended.
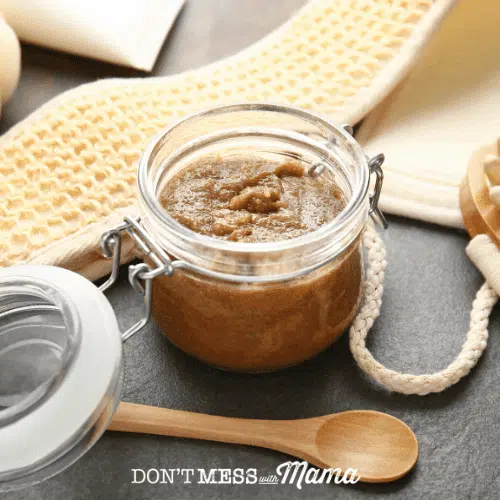
- Store in airtight glass container.

Why This DIY Orange Cedarwood Sugar Scrub Works
1. Brown Sugar
Brown sugar is a natural exfoliator with small particles that makes it gentler than sea salt as a scrub and softer than regular sugar. That’s why it’s perfect for the face or sensitive skin. Brown sugar also contains glycolic acid, which is a natural alpha-hydroxl acid that helps to remove dead skin cells and promote new cell turnover – giving skin a healthy glow. It’s also hydrating and helps to keep moisture locked in and toxins out.
2. Coconut Oil
Is there anything coconut oil can’t do? I mean, it just makes this scrub so heavenly to use! If you don’t know already, coconut oil is known to deeply penetrate and moisturize even the driest of the dry skin so if you have ashy knees and elbows, coconut oil is your new best friend. Not only that, coconut oil will also nourish and rehydrate peeling cuticles as well as restore luster and plumpness to dry hands and feet.
3. Essential Oils
Essential oils are the scent for this DIY Orange Cedarwood Sugar Scrub. The orange is revitalizing and helps with cell turnover on the skin, while cedarwood is relaxing and helps to nourish the skin.
An Easy DIY Sugar Scrub
It’s pretty easy to make this sugar scrub. Just following the directions below and store in a glass Mason jar. I really like fractionated coconut oil for as the carrier oil in this recipe. It’s in a liquid form all the time, unlike regular coconut oil that turns into a solid when it’s cold, and it’s so nourishing for the skin.
Other alternative carrier oils that can work in place of the fractionated coconut oil are almond oil, avocado oil, and even olive oil. Look for organic, cold-pressed carrier oils. Basically, if it’s good enough to eat then use it on your skin.
How to Use This DIY Coconut Brown Sugar Scrub
For Body
Scoop out a dollop of this DIY Orange Cedarwood Sugar Scrub to exfoliate the skin. Focus on dry areas like elbows and knees for really soft moisturized skin.
For Hands
Use a small amount and massage your hands, especially around the cuticles, for soft and supple hands.

How Often Should I Use This DIY Sugar Scrub?
This is completely up to you. Some people use it daily, others use it 2-3 times a week. A lot of people tend to use them more during the winter when skin is especially dry.
The Difference Between Salt and Sugar Scrubs
Sugar scrubs are gentler than salt scrubs because the granule is round and therefore doesn’t have any ability to “cut” the skin. It’s a far better choice for sensitive skin types and the only choice for the face. Sugar granules dissolve more easily in hot water, and they are less abrasive than salt scrubs.
How Long Does DIY Sugar Scrub Last?
Sugar scrubs should last for quite a long time on a shelf, as long as it has a lid on it and is airtight. A DIY sugar scrub lasts at least two months, but be mindful of your extra additions when determining how long to store it. As long as your don’t get any water in the scrub, then it should last quite a long time. Any water can cause it to spoil and get moldy.
Top Tips for This DIY Sugar Scrub
- In the shower: At the end of showering, lightly pat your skin with a towel, leaving a little moisture and apply the sugar scrub in a circular motion to your entire body. When using a sugar scrub on your face, gently apply the sugar scrub in a circular motion.
- In the bath: To get the best results, it helps to have a nice soak in the tub first, at least 20 minutes. This will help soften the outer layers of skin and make it easier to exfoliate. You’ll be left with beautiful, glowing, soft and supple skin.
- You will want a container to put your sugar scrub in that seals and is airtight.
- These sugar scrubs make such wonderful and easy homemade Christmas gifts, especially if you need something last-minute.
How to Get Started with Essential Oils
- Sign up for my FREE essential oil email course in order to learn the basics.
- Check out my FREE masterclass all about essential oils and this beginner’s guide to essential oils.
- Get my essential oils online course – complete with video tutorials, e-book and everything you need to get started with essential oils.
- Find out how to buy essential oils at a huge discount + get an additional 10% off your first order with my coupon code. It’s the best deal around and a great way to get started with essential oils. Plus lots of freebies just for you.
More DIY Recipes You Might Like
Did you try this? Don’t forget to rate it and comment below to let me know how it went. You can also FOLLOW ME on Facebook, Instagram and Pinterest.
DIY Pumpkin Seed Body Scrub
Equipment
- 8-10 oz Mason Jar with Wide Mouth
Ingredients
- 1 cup brown sugar
- 2 tbsp Pumpkin Seed Oil
- 10 drops Sandalwood essential oil
- 10 drops Orange essential oil
Instructions
- Gather ingredients together.
- Pour brown sugar into a medium sized bowl.
- Add fractionated coconut oil.
- Add essential oils.
- Mix until thoroughly blended.
- Store in airtight glass container.
Want More DIY Recipes?
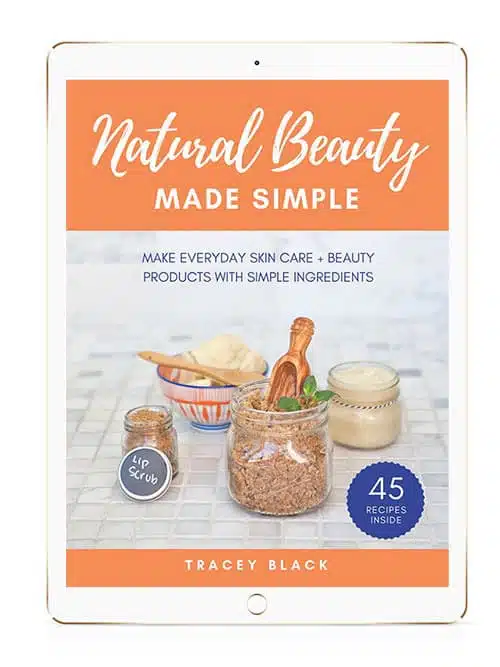
Check out my book Natural Beauty Made Simple. It comes with 45 homemade skincare recipes with a set of printable labels and gift tags. You can download it instantly to your phone, computer or e-reader, so it’s portable and can go with you anywhere!
- Make your own organic beauty and skin care products for less than $25 a month!
- Learn simple techniques to make your own skincare – without the fuss of complicated recipes or hard-to-find ingredients
- Get tried-and-true recipes that work to nourish the skin and make it look more radiant than ever before
- Create beautiful gifts for friends and family with the printable labels and gift tags I’ve included with this book
How long does this last?
It should last a couple of months since there’s no water in it.
So why fractionated coconut oil and not just plain? Also, since it’s not being ingested, could you not get away with less expensive essential oils?
I still use Young Living essential oils because the oils do get absorbed into your skin, so using the best oils is really key. I like fractionated better for this recipe because the regular coconut oil stiffens up when it’s cold. But you could use regular coconut oil if you prefer.